Sunday, May 24, 2015

Local storage with SQLite for Hybrid Mobile App with IONIC, Cordova and sqlite

After hours of search on google there was no proper documentation on how to implement step by step instructions to implement local storage for hybrid mobile application.

This post will help you implement the feature without searching multiple locations for instructions.

1) Create a IONIC or Cordova basic application using command line 

    Cordova based app 
        Cordova create localStoreApp 
    IONIC based app
        ionic start localStoreApp

2) Add the ios platform to the application 

    cd localStoreApp
  cordova platform add ios
  ioinc platform add ios

3) Build the basic app to check cli is correctly building 

    cordova build ios
  ionic build ios

4) Add sqlite plugin 

    cordova plugin add https://github.com/litehelpers/cordova-sqlite-common

5) Add the plugin to the config.xml file in the current directory, 
under the setting <access origin="*"/> 

     <plugin name="SQLitePlugin" value="SQLitePlugin" />

6) If local storage is not required to be backed up on iCloud, 
Under the settings <platform name="ios">

      <preference name="BackupWebStorage" value="local"/>

7) Copy the SQLitePlugin.js file under the directory 

      plugins / cordova-sqlite-common/www/

      SQLitePlugin.js

8)  Past the copied file into the current locations www/js directory

9)  Refer the SQLitePlugin.js file from the index.html file.

     Reference should be below cordova.js file

10) Access the databased on where it needs to be used. 
     sqlite should be accessed after the deviceready event in Cordova and          $ionicPlatform.ready call back in IONIC.

     var db = window.sqlitePlugin.openDatabase("Database", "1.0", "Demo", -1);

  db.transaction(function(tx) {
  tx.executeSql('DROP TABLE IF EXISTS test_table');
  tx.executeSql('CREATE TABLE IF NOT EXISTS test_table (id integer primary key, data text, data_num integer)');
  alert("DB droped")
  tx.executeSql("INSERT INTO test_table (data, data_num) VALUES (?,?)", ["test", 100], function(tx, res) {
  console.log("insertId: " + res.insertId + " -- probably 1");
                //alert("rowsAffected: " + res.rowsAffected + " -- should be 1");
  alert("Data Inserted")
                tx.executeSql("select count(id) as cnt from test_table;", [], function(tx, res) {
  console.log(("res.rows.length: " + res.rows.length + " -- should be 1");
  console.log(("res.rows.item(0).cnt: " + res.rows.item(0).cnt + " -- should be 1");
  alert("Data Selected")
  });

  tx.executeSql("select data from test_table;", [], function(tx, res) {
  console.log(("res.rows.length: " + res.rows.length + " -- should be 1");
  alert("res.rows.item(0) :" + res.rows.item(0).data );
  alert("Data Selected")
  });


  }, function(e) {
      alert("ERROR: " + e.message);
  });
  });

11)  Build and Prepare the application for platform

    cordova build ios
  ionic build ios

12) run the application using the cli command or via the xcode 

    cli - cordova run ios --device
        ionic run ios --device

 xcode - navigate the the folder
           platforms / ios 
           open the file localstoreapp.xcodeproj 
           run the application by clicking on play button or product menu > run 

Kindly let me know if you encounter any build error or if the application does not get deployed correctly. 

Suppose if the application does get built but not correctly gets deployed then remove the platform and add it. remember to run the prepare ios command which will download the necessary files needed for ios. 

Happy coding

Tuesday, April 8, 2014

Creating HTML 5 based android Mobile App with cordova (PhoneGap)

This article covers the steps followed to successfully create the first PhoneGap based Android Application.

Follow the steps as per the given order bellow

  1. Pre-requests
  2. Installing Apache ANT
  3. Installing Eclipse 
  4. Adding Android ADT Plugin
  5. Installing NodeJS
  6. Installing Cordova
  7. Setting up Environment Variable
  8. Creating Cordova App
1. Pre-requests

Confirm Java is installed on your machine. 
eg: Open command prompt and type Java. You should see a screen similar to bellow.

If Java is not installed you should be able to download from below location.

2. Installing Apache ANT

Apache ANT can be found in below location
download the highlighted file and open the zip file. Open the extracted folder and copy the ant folder to c:/ folder.

3. Installing Eclipse 

Download Eclipse from below location.

Extract the ZIP file and copy the Eclipse to c:/Program Files location 

4. Adding Android ADT Plugin
Steps to add Plugin
    Open Eclipse
    Click on Help
Follow as per the screen shots
Click on Add
 Type as per the screen.
Name : ADT Plugin
Location: https://dl-ssl.google.com/android/eclipse/
 Select the check boxes as per the screen 

 Agree the licences for all and click on finish.
It would take quite a long time to download and install the ADT.

5. Installing NodeJS

Download NodeJS from below location.

6. Installing cordova 
Open NodeJS command prompt which is in All Programs as shown below.
 Once the command prompt is open type below command
npm install cordova


7.Setting up Environment Variables

All the system environment variables are listed below with name and value pair. If you find any of them are missing create them under system environment variables.
The locations are as per my machine and you need to find the correct location as per your installation.
  • Set up ANT_HOME path in user variables
If you don't find ANT_HOME in your user variables create New one as per instructions below
Click on NEW button under user variables and type these values.
Variable : ANT_HOME
Value    : c:\ant (remember ant was extracted and copied to c: root directory)
  • Set up ANDROID_ADT_PATH in system variable
If you don't find ANDROID_NDK_PATH in your system variables create New one as per instructions below
Click on NEW button under system variables and type these values.
Variable : ANDROID_NDK_PATH
Value    : C:\Users\UDXF001\Documents\Android\ndk\android-ndk-r8d (by default when the ADT Plugin is installed via eclipse it will put under the users documents.)
  • Set up PATH in system variable

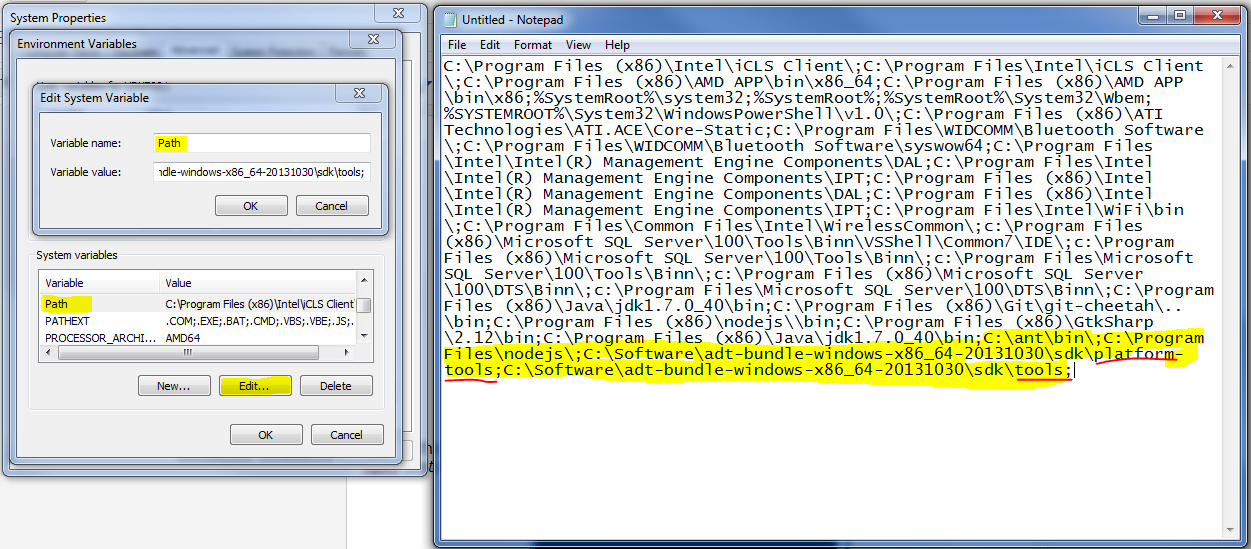
Select path under the system variables. Click on Edit and copy the variable content in Variable value.
Past the content in a new notepad.

Check if nodejs is correctly installed by searching for nodeJS in the content. If it does not exist then you need to install the nodejs as per the instructions given on top. Expected path should be C:\Program Files\nodejs\;

Add the ANT bin path by typing C:\ant\bin\; (again location based on where it is...)

Add android sdk paths as per below given values.

C:\Software\adt-bundle-windows-x86_64-20131030\sdk\platform-tools;

C:\Software\adt-bundle-windows-x86_64-20131030\sdk\tools;
to find the location search for adt-bundle-windows in the file explorer and replace it with your own location.

Once the above settings are changed copy the hole content, delete the content in variable value and past it there.

Next restart the PC and since all are good to go. 

We will create our first application in the next step and emulate it.

8. Creating cordova android based app

follow the instructions highlighted in yellow step by step
Once the Build Success is displayed the android emulator will prompt and this would take quite a while.

You will be able to see an app similar to this which means you are good to go to the next steps.


I will be writing my next Blog on how to work with Aptana Studio to create apps which is more user friendly to work with HTML apps.

Please give your feedback on this so that it would help me and others to improve. Raise your questions if you find any steps failing. Most likely on step 8 you will encounter some issue like http://stackoverflow.com/questions/22626338/unable-to-resolve-phone-gap-error-cmd-command-failed-with-exit-code-enoent-3

and my answer to that is http://stackoverflow.com/questions/22312332/phone-gap-error-cmd-command-failed-with-exit-code-enoent/22952259#22952259

Happy Codeing :)

Sunday, December 8, 2013

C# Searching Data form DataTable does not work as expected

An XML file was loaded to the datatable and performed a search for the member id as shown bellow. For a few it was returning records and for the few while the data exists it did not return the data.

string path = WebConfigurationManager.AppSettings.Get("xmlFilePath");
 if (path.Length > 0)
 {
    ds.ReadXml(path);
    if (ds.Tables.Count > 0)
    {
       DataRow[] result = ds.Tables[0].Select(
                     string.Format("member_id={0}", memberID));
       if (result.Length > 0)
       {
          lblCardNumber.Text = result[0]["card_no"].ToString();
          lblPointsBalance.Text = result[0]["closing_balance"].ToString();
       }
    }
 }

The reason being member_id column was a string column and if the change was as shown below it did return the data.

       DataRow[] result = ds.Tables[0].Select(
                     string.Format("member_id='{0}'", memberID));

I am yet to find the reason for this issue. The correct way to find the string value is to add (') before and after the value. 

Sunday, October 27, 2013

ASP.NET MVC Structure Map, No parameter less constructor defined for this object.

While using Structure Map with ASP.NET MVC there was a error "No parameter less constructor defined for this object" for the already working controller. 

 [HttpPost]
        public ActionResult CreateBranch(mBranch branch)
        {
            _service.CreateBranch(branch);
           
            return new JsonResult { Data = "Registered", JsonRequestBehavior = JsonRequestBehavior.AllowGet };

        }


The Structure map Controller factory were configured properly and once this method is commented everything working except when this post method was called the error was thrown.

Reason why it threw the exception was that the class mBranch had only once constructor with a parameter when the method is called mBranch is instantiated it there was no constructor without parameter and resulted in this error.

public class mBranch
    {
        public mBranch(int companyId)
        {
            CompanyID = companyId;

            BranchContact = new mContactInfo();
        }


             //error thrown due to this constructor was missing
        public mBranch()
        {
            BranchContact = new mContactInfo();
        }

      }

Tuesday, October 1, 2013

Editing a macro which automatically open and close after the macro runs

I spend hours trying to edit my macro which when opened it will run the macro and create a separate file and then closes by it self.

Thanks for this post to same my time.

All you need to do is to 

  1. Open the excel application 
  2. Go to File
  3. Go to Open
  4. Pres on Shift Button
  5. Then select the macro file
  6. Go to view
  7. Select the view macro to see the code
:)

Friday, June 7, 2013

Multiple foreign keys within same table using CodeFrist Enitty Framework and Fluent API

This example shows how to work with multiple foreign key referred to the same table using CodeFirst Entity Framework (Inverse Navigation Properties 
)

Parent Table (Branch) has two foreign keys (Primary Contact and Secondary Contact) referring to the Child Table (Contact).


Branch
BranchIDguid
Branch Namevarchar
PrimaryContactIDguid,null
SecondaryContatIDguid,null


Contact
ContactIDguid
Firstnamevarchar
LastNamevarchar
Addressvarchar
Genderchar
First of all we need to create the Branch Class

 public class Branch
    {
        public Guid BranchID { get; set; }
        public string BranchName { get; set; }
        public Nullable<Guid> PrimaryContactID { get; set; }
        public Nullable<Guid> ScondaryContactID{ get; set; }
        public Contact PrimaryContact { get; set; }
        public Contact SecondaryContact { get; set; }
        
    }

Then creating the Contact Class


 public class Contact
    {
        public Guid ContactID { get; set; }
        public string Firstname { get; set; }
        public string Lastname { get; set; }        public ICollection<Branch> PrimaryContactFor { get; set; }
        public ICollection<Branch> ScondaryContactFor{ get; set; }
        
    }


When configuring in the fluent API below shown coding is used.

protected override void OnModelCreating(DbModelBuilder modelBuilder)
        {
            base.OnModelCreating(modelBuilder);
            modelBuilder.Entity<Branch>().HasOptional(b => b.PrimaryContact).WithMany(a => a.PrimaryContactFor).HasForeignKey(b=>b.PrimaryContactID);
            modelBuilder.Entity<Branch>().HasOptional(b => b.SecondaryContact).With Many (a => a.ScondaryContactFor).HasForeignKey(b=>b.ScondaryContactID);

        }

Happy Coding :)


Wednesday, May 8, 2013

Shortcut Keys in Visual Studio Editor

Some Useful Visual Studio shortcut keys


I would like to share some on the shortcut keys that are available in visual studio that will be very useful for the developers for fast codeing. I have segregated them into different parts.

VS Tools and Explore Bars (Windows) Related


Solution ExplorerCtrl +W, S 
Server ExplorerCtrl + W, L
Error ListCtrl + W, E
Output WindowCtrl + W, O
Property WindowCtrl + W, P
Tool BoxCtrl + W, X

Code File Related 


Comment SelectionCtrl +E, C or Ctrl + K, C 
Uncomment SelectionCtrl + E, U or Ctrl + K, U
Format DocumentCtrl + E, D
Make UPPERCASECtrl + Shit, U
Make lowercaseCtrl + U
Place BookmarkCtrl + B + E
Clear BookmarkCtrl + B + C
Toggle BookmarkCtrl + B + T
Previous BookmarkCtrl + B + P
Next BookmarkCtrl + B + N

Project Related 


Add New ClassShift + Alt + C
Add New ItemCtrl + Shift + A
Add Existing ItemShift + Alt + A

I use these shortcuts daily in my coding life and makes my life easy and fast to code. Hope this will effect your coding life and i would like to hear your feedback on this and please suggest if you have any. 

Your feedbacks are warmly welcomed.

Happy Coding :)