Showing posts with label android. Show all posts

Sunday, May 24, 2015

Local storage with SQLite for Hybrid Mobile App with IONIC, Cordova and sqlite

After hours of search on google there was no proper documentation on how to implement step by step instructions to implement local storage for hybrid mobile application.

This post will help you implement the feature without searching multiple locations for instructions.

1) Create a IONIC or Cordova basic application using command line 

    Cordova based app 
        Cordova create localStoreApp 
    IONIC based app
        ionic start localStoreApp

2) Add the ios platform to the application 

    cd localStoreApp
  cordova platform add ios
  ioinc platform add ios

3) Build the basic app to check cli is correctly building 

    cordova build ios
  ionic build ios

4) Add sqlite plugin 

    cordova plugin add https://github.com/litehelpers/cordova-sqlite-common

5) Add the plugin to the config.xml file in the current directory, 
under the setting <access origin="*"/> 

     <plugin name="SQLitePlugin" value="SQLitePlugin" />

6) If local storage is not required to be backed up on iCloud, 
Under the settings <platform name="ios">

      <preference name="BackupWebStorage" value="local"/>

7) Copy the SQLitePlugin.js file under the directory 

      plugins / cordova-sqlite-common/www/

      SQLitePlugin.js

8)  Past the copied file into the current locations www/js directory

9)  Refer the SQLitePlugin.js file from the index.html file.

     Reference should be below cordova.js file

10) Access the databased on where it needs to be used. 
     sqlite should be accessed after the deviceready event in Cordova and          $ionicPlatform.ready call back in IONIC.

     var db = window.sqlitePlugin.openDatabase("Database", "1.0", "Demo", -1);

  db.transaction(function(tx) {
  tx.executeSql('DROP TABLE IF EXISTS test_table');
  tx.executeSql('CREATE TABLE IF NOT EXISTS test_table (id integer primary key, data text, data_num integer)');
  alert("DB droped")
  tx.executeSql("INSERT INTO test_table (data, data_num) VALUES (?,?)", ["test", 100], function(tx, res) {
  console.log("insertId: " + res.insertId + " -- probably 1");
                //alert("rowsAffected: " + res.rowsAffected + " -- should be 1");
  alert("Data Inserted")
                tx.executeSql("select count(id) as cnt from test_table;", [], function(tx, res) {
  console.log(("res.rows.length: " + res.rows.length + " -- should be 1");
  console.log(("res.rows.item(0).cnt: " + res.rows.item(0).cnt + " -- should be 1");
  alert("Data Selected")
  });

  tx.executeSql("select data from test_table;", [], function(tx, res) {
  console.log(("res.rows.length: " + res.rows.length + " -- should be 1");
  alert("res.rows.item(0) :" + res.rows.item(0).data );
  alert("Data Selected")
  });


  }, function(e) {
      alert("ERROR: " + e.message);
  });
  });

11)  Build and Prepare the application for platform

    cordova build ios
  ionic build ios

12) run the application using the cli command or via the xcode 

    cli - cordova run ios --device
        ionic run ios --device

 xcode - navigate the the folder
           platforms / ios 
           open the file localstoreapp.xcodeproj 
           run the application by clicking on play button or product menu > run 

Kindly let me know if you encounter any build error or if the application does not get deployed correctly. 

Suppose if the application does get built but not correctly gets deployed then remove the platform and add it. remember to run the prepare ios command which will download the necessary files needed for ios. 

Happy coding

Tuesday, April 8, 2014

Creating HTML 5 based android Mobile App with cordova (PhoneGap)

This article covers the steps followed to successfully create the first PhoneGap based Android Application.

Follow the steps as per the given order bellow

  1. Pre-requests
  2. Installing Apache ANT
  3. Installing Eclipse 
  4. Adding Android ADT Plugin
  5. Installing NodeJS
  6. Installing Cordova
  7. Setting up Environment Variable
  8. Creating Cordova App
1. Pre-requests

Confirm Java is installed on your machine. 
eg: Open command prompt and type Java. You should see a screen similar to bellow.

If Java is not installed you should be able to download from below location.

2. Installing Apache ANT

Apache ANT can be found in below location
download the highlighted file and open the zip file. Open the extracted folder and copy the ant folder to c:/ folder.

3. Installing Eclipse 

Download Eclipse from below location.

Extract the ZIP file and copy the Eclipse to c:/Program Files location 

4. Adding Android ADT Plugin
Steps to add Plugin
    Open Eclipse
    Click on Help
Follow as per the screen shots
Click on Add
 Type as per the screen.
Name : ADT Plugin
Location: https://dl-ssl.google.com/android/eclipse/
 Select the check boxes as per the screen 

 Agree the licences for all and click on finish.
It would take quite a long time to download and install the ADT.

5. Installing NodeJS

Download NodeJS from below location.

6. Installing cordova 
Open NodeJS command prompt which is in All Programs as shown below.
 Once the command prompt is open type below command
npm install cordova


7.Setting up Environment Variables

All the system environment variables are listed below with name and value pair. If you find any of them are missing create them under system environment variables.
The locations are as per my machine and you need to find the correct location as per your installation.
  • Set up ANT_HOME path in user variables
If you don't find ANT_HOME in your user variables create New one as per instructions below
Click on NEW button under user variables and type these values.
Variable : ANT_HOME
Value    : c:\ant (remember ant was extracted and copied to c: root directory)
  • Set up ANDROID_ADT_PATH in system variable
If you don't find ANDROID_NDK_PATH in your system variables create New one as per instructions below
Click on NEW button under system variables and type these values.
Variable : ANDROID_NDK_PATH
Value    : C:\Users\UDXF001\Documents\Android\ndk\android-ndk-r8d (by default when the ADT Plugin is installed via eclipse it will put under the users documents.)
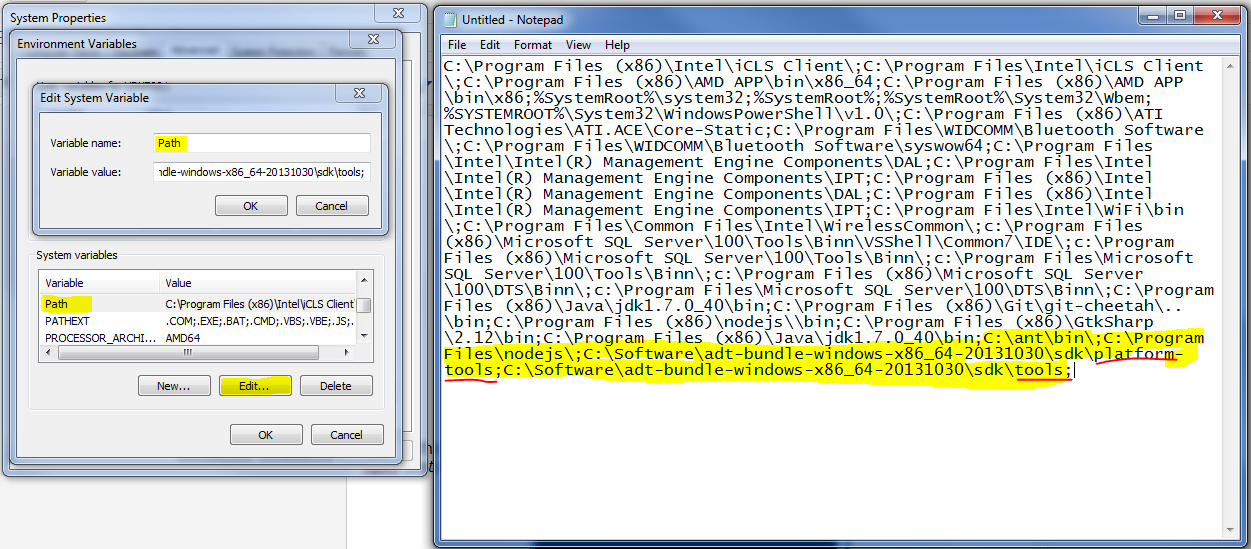
  • Set up PATH in system variable

Select path under the system variables. Click on Edit and copy the variable content in Variable value.
Past the content in a new notepad.

Check if nodejs is correctly installed by searching for nodeJS in the content. If it does not exist then you need to install the nodejs as per the instructions given on top. Expected path should be C:\Program Files\nodejs\;

Add the ANT bin path by typing C:\ant\bin\; (again location based on where it is...)

Add android sdk paths as per below given values.

C:\Software\adt-bundle-windows-x86_64-20131030\sdk\platform-tools;

C:\Software\adt-bundle-windows-x86_64-20131030\sdk\tools;
to find the location search for adt-bundle-windows in the file explorer and replace it with your own location.

Once the above settings are changed copy the hole content, delete the content in variable value and past it there.

Next restart the PC and since all are good to go. 

We will create our first application in the next step and emulate it.

8. Creating cordova android based app

follow the instructions highlighted in yellow step by step
Once the Build Success is displayed the android emulator will prompt and this would take quite a while.

You will be able to see an app similar to this which means you are good to go to the next steps.


I will be writing my next Blog on how to work with Aptana Studio to create apps which is more user friendly to work with HTML apps.

Please give your feedback on this so that it would help me and others to improve. Raise your questions if you find any steps failing. Most likely on step 8 you will encounter some issue like http://stackoverflow.com/questions/22626338/unable-to-resolve-phone-gap-error-cmd-command-failed-with-exit-code-enoent-3

and my answer to that is http://stackoverflow.com/questions/22312332/phone-gap-error-cmd-command-failed-with-exit-code-enoent/22952259#22952259

Happy Codeing :)